Hello!
Welcome back to “Learn You An Actor (System) For Great Good!”. If you haven’t read the first part, jump there to learn how to write a minimalistic actor runtime using Java 17.
As promised, in this second part I am showing how to write a tiny chat client/server using the runtime we wrote. Then, we will run it using JBang! Next time, we will learn how to create a typed version of the same actor runtime and revisit the examples!
Because this post is quite long, here is a table of contents.
Overview 🔗
Our chat applications will be extremely simple:
Each user picks a nickname, they connect to a server through their client and then they send messages to eachother:
- The client waits for the user to input the text of a message; it also displays the messages that it receives from the server.
- The chat server accepts incoming connections, it receives messages, and it propagates them to all the clients that are connected.
For instance, in this picture Duffman is sending the message "Are you ready?" to the server, and all of Carl, Lenny and Barney receive it (to great sadness for Barney, who’s the designated driver).
Protocol 🔗
Computers transfer bytes, so our clients and server should know how to chunk the incoming stream of bytes into self-contained messages; and, likewise, they should produce an outgoing stream of bytes that they know how to chunk.
We will use a very simple line-based protocol:
- Each message contains the nickname of the user that wrote the message, and the body of the message
- Every client writes a message on a new line
- The server tokenizes the input on the newline, obtaining a message
- The server rebroadcasts each message to the clients that are connected.
User A: Message 1 \n
User B: Message 2 \n
...
We may encode this in the following stream of JSON payloads :
{ "User A": "Message 1" } \n
{ "User B": "Message 2" } \n
...
In fact, because JSON does not allow unescaped newlines, we can safely use '\n' as a message separator in the input/output stream of the socket.
Then, in order to send a message, a client:
- serializes the message into JSON
- it concatenates a newline character at the end of the payload
- it writes the message to its outgoing stream
In order to receive a message, a client:
- buffers the bytes in its input stream, until a newline is encountered;
- when a newline is found, bytes that have been buffered up to that point are a serialized message
- thus, the client may deserialize the buffer and display the result message
A server, similarly, to broadcast messages:
- buffers the bytes in its input stream, until a newline is encountered
- when a newline is found, the bytes that have been buffered up to that point are a serialized message
- each serialized message is immediately re-broadcast to all the connected clients
In a real-world implementation, the input should be at least parsed and validated, but we will skip it here for simplicity.
Sockets 🔗
We will handle socket connections using the Java NIO AsyncServerSocketChannel and AsyncSocketChannel.
The original version of this blog post used java.net’s ServerSocket and Socket: these are blocking APIs, so they would take over the underlying thread of the pool. While they are usable, they require more boilerplate, and they do not make a great companion to the actor programming model. In the future (heh, Futures, get it?) we may have better luck using blocking APIs on top of Project Loom: then all threads will be “virtual threads”. But in the meantime we will have to make do.
The full story is that about one week ago I was finished polishing this blog post. Then I let my friend Andrea read it, and he basically rewrote the example from scratch using Java NIO. Indeed, the result is way simpler, but I am now here rewriting the entire blog post. Gee, thanks, I guess.
Well, the joke’s on him, he had to re-read the entire draft.
Kidding aside, NIO APIs plays much better with the actor runtime, and it allowed to get rid of most of the boilerplate. However, these APIs were largely developed before Java 8, so a lot of goodies such as lambdas and CompletableFutures were still not available; they are thus a bit clunky to use. For your convenience, and in order not to burden too much this article, we have prepared a tiny library that you can import in your code, that wraps the callback-based APIs in AsyncServerSocketChannel and AsyncSocketChannel, into APIs that return a CompletableFuture.
It was designed so that you can use it from a JBang script by adding the directives:
//REPOS mavencentral,jitpack=https://jitpack.io/
//DEPS com.github.evacchi:java-async-channels:main-SNAPSHOT
It contains only two classes Channels.ServerSocket and Channels.Socket. They expose the relevant methods from, respectively, AsyncServerSocketChannel and AsyncSocketChannel. They do not pretend to be a complete replacement for the real API, but they are just enough for this chat application. At the end of this blog post you will find an addendum that explains how to implement them yourself.
Chat Server 🔗
First of all, let’s create a “namespace” for our actors. In the first post: I chose to use an interface as a code container. The reason is that most members will be public static by default. We can initialize the actor runtime here.
public interface ChatServer {
    Actor.System system = new Actor.System(Executors.newCachedThreadPool());
}
This interface will contain our main method and all of the Behavior methods and all our messages (as Java records).
In the actor-based implementation of the server, I have chosen to break down the server-related behavior into two “root” actors. One deals with I/O (serverSocketHandler) and the other (clientManager) orchestrates the client connections:
serverSocketHandlerwaits for incoming connection on theServerSocket. When there is a new incoming connection, it notifies theclientManager.clientManagerkeeps track of all the active clients. When a client sends a message, theclientManageris responsible for forwarding the message to all the clients.
Let’s see them in detail.
serverSocketHandler 🔗
serverSocketHandler accepts incoming connections; when one such a connection is received, it will spawn a new client actor and send it to the clientManager.
The behavior requires a reference to the clientManager and a Channels.ServerSocket object.
static Behavior serverSocketHandler(Address self, Address clientManager, Channels.ServerSocket serverSocket) {

}
When the actor is initialized and the behavior is first evaluated, we accept() a new incoming connection.
The method returns a CompletableFuture<Channels.Socket>. Thus, we need to handle the succesfull and the exceptional case.
static Behavior serverSocketHandler(Address self, Address clientManager, Channels.ServerSocket serverSocket) {
    serverSocket.accept()
            .thenAccept(skt -> self.tell(new ClientConnection(skt)))
            .exceptionally(exc -> { exc.printStackTrace(); return null; });
    ...
}
In the exceptional case, we just print the error. We may also kill the actor and restart it. As an exercise you may customize this behavior.
In the successful case, we send a message to the actor, so that it can resume processing:
record ClientConnection(Channels.Socket socket) {}
the actual behavior is then to handle such a message:
return msg -> switch (msg) {
    case ClientConnection conn -> {
        out.printf("Client connected at %s\n", conn.socket().remoteAddress());
        var client =
                system.actorOf(ca -> ChannelActor.socketHandler(ca, childrenManager, conn.socket()));
        childrenManager.tell(new ClientConnected(client));

        yield Become(serverSocketHandler(self, childrenManager, serverSocket));
    }
    default -> throw new RuntimeException("Unhandled message " + msg);
};
Upon receiving this message, we create an actor to handle the Channels.Socket, and then send it to the clientManager:
record ClientConnected(Address addr) {}
then, we stay in this state, but we “recurse” by forcing the re-evaluation of this method again:
yield Become(serverSocketHandler(self, clientManager, serverSocket));
because at the beginning of the method we invoke accept(), the result is to effectively wait for a new incoming connection.
clientSocketHandler 🔗
In the previous section we created a clientSocketHandler; but we haven’t defined its behavior yet:
static Behavior clientSocketHandler(Address self, Address clientManager, Channels.Socket channel) {

}
this actor:
- reads buffers from a
Channels.Socketand tokenizes messages at each new line. - writes messages to a
Channels.Socket
Let us start with reads; let us define the following messages:
record ReadBuffer(String content) {}
record LineRead(String payload) {}
When the actor is created, we need to subscribe the channel for reading. Again, the read() method returns a CompletableFuture<String>, with the String being the buffer that has been read so far.
// subscribe the channel
channel.read()
        .thenAccept(s -> self.tell(new ReadBuffer(s)))
        .exceptionally(err -> { err.printStackTrace(); return null; });
Similarly to the previous case, we handle the succesful case by sending the ReadBuffer message to the actor.
Now, if you recall, we need to look for newlines in the buffer, and tokenize the input; because the buffer it’s for its nature, a “sliding window”, we also need to keep around an accumulator. For instance, suppose that we receive first the message “Hi!” from Carl and then “Hello” from Lenny.
{"Carl":"Hi!"}
{"Lenny":"Hello"}
If the “window” is not large enough to contain an entire message it would need to keep the partial message around until it finds a newline.

We can create a “recursive” behavior that accumulates into partial the message that has been read so-far.
We make partial an argument of the method:
static Behavior clientSocketHandler(Address self, Address clientManager, Channels.Socket channel, String partial) {
    // subscribe the channel
    channel.read()
            .thenAccept(s -> self.tell(new ReadBuffer(s)))
            .exceptionally(err -> { err.printStackTrace(); return null; });

    return switch (msg) {
        case ReadBuffer incoming -> {
            var acc = (partial + incoming.content());
            var eol = acc.indexOf('\n');
            if (eol >= 0) {
                var line = acc.substring(0, eol);
                clientManager.tell(new LineRead(line));
                var rest = incoming.content().substring(Math.min(eol + 2, incoming.content().length()));
                yield Become(socketHandler(self, clientManager, channel, rest));
            } else {
                var rest = partial + incoming.content();
                yield Become(socketHandler(self, clientManager, channel, rest));
            }
        }
        // other cases...
    };
}
When the recursive call is invoked, then the channel is subscribed again for reading.
This actor will also handle writing to the channel:
record WriteLine(String payload) {}

static Behavior clientSocketHandler(Address self, Address parent, Channels.Socket channel, String partial) {
    ...
    msg -> switch (msg) {
        ...
        case WriteLine line -> {
            channel.write(line.payload());
            return Stay;
        }
        default -> throw new RuntimeException("Unhandled message " + msg);
    };
}
For convenience, you may want to add the overload without the partial argument:
static Behavior clientSocketHandler(Address self, Address parent, Channels.Socket channel, String partial) {
    return clientSocketHandler(self, parent, channel, "");
}
and this is the one that gets invoked upon creation of the actor in serverSocketHandler.
You can also make the other overload private.
clientManager 🔗
A clientManager is notified when a new client is connected, and it receives lines that are read from the input stream. Because the clientManager keeps track of all the client actors, it is able to forward them each LineRead.
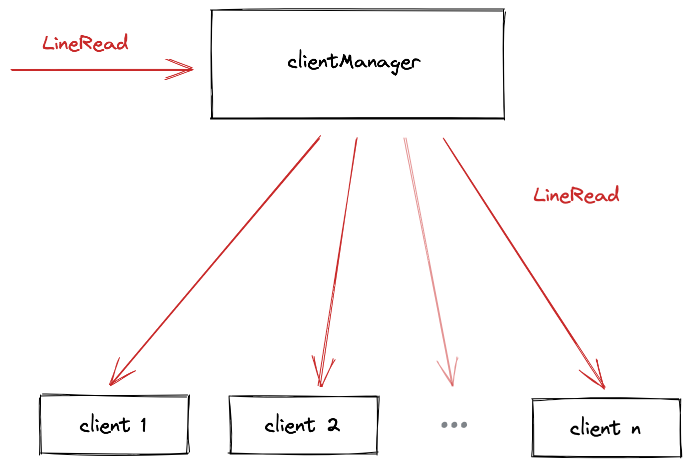
    static Behavior clientManager(Address self) {
        var clients = new ArrayList<Address>();
        return msg -> {
            switch (msg) {
                case ClientConnected cc -> clients.add(cc.addr());
                case LineRead lr ->
                        clients.forEach(client -> client.tell(new WriteLine(lr.payload())));
                default -> throw new RuntimeException("Unhandled message " + msg);
            }
            return Stay;
        };
    }
Starting the Server 🔗
There we go! We only need to create our actors in the main method:
static void main(String... args) throws IOException, InterruptedException {
    var serverSocket = Channels.ServerSocket.open();

    var clientManager =
            system.actorOf(self -> clientManager(self));
    var serverSocketHandler =
            system.actorOf(self -> serverSocketHandler(self, clientManager, serverSocket));

    Thread.currentThread().join(); // ensure the main thread does not quit
}
You can now start your server with JBang! Add the following lines at the top of your file:
//JAVA 17
//JAVAC_OPTIONS --enable-preview --release 17
//JAVA_OPTIONS  --enable-preview
//REPOS jitpack=https://jitpack.io/
//DEPS com.github.evacchi:min-java-actors:main-SNAPSHOT
//DEPS com.github.evacchi:java-async-channels:main-SNAPSHOT
If everything is right, then you can type:
j! ChatServer.java
If you are lazy, you can run it from this URL directly:
j! https://raw.githubusercontent.com/evacchi/min-java-actors/main/src/main/java/io/github/evacchi/asyncchat/ChatServer.java
The program will start waiting for incoming connections, printing:
Server started at /127.0.0.1:4444.
Neat, huh?
Chat Client 🔗
Of course, we are not done yet. We still need to write the client app. Luckily that is incredibly short: we only need 2 actors. To be fair, you may just dedicate one thread to each and call it a day, but for completeness, let’s use the actor system: the result will be quite compact.
We will define:
- an actor that reads from and writes to the server socket
- an actor that handles the messages from user input, and display incoming messages to screen
Notice that, for simplicity, the messages that are written locally are not echoed immediately to screen (as it would usually happen). Instead, we will always print to screen whatever comes back from the server. Because the server always re-broadcasts everything to everyone, we will also effectively echo whatever the user wrote.
There is only two types of messages:
record Message(String user, String text) {}
In this case, the Message contains the nickname of the user who wrote the message, and the actual text of the message.
Actor.System system = new Actor.System(Executors.newCachedThreadPool());
The main method:
- takes the nickname from the first command-line argument:
- it creates the
clientactor, to handle the socket connection - it starts the input reading loop: it will read from standard input the messages
and send them to the
client.
String HOST = "localhost"; int PORT = 4444;

static void main(String[] args) throws IOException {
    // take the user name from the CLI args
    var userName = args[0];

    var channel = Channels.Socket.open(HOST, PORT);
    // start the `client` actor in `connecting` state.
    var client = system.actorOf(self -> clientConnecting(self, channel));

    out.printf("User '%s' connecting...", userName);

    // read user input line-by-line
    var scann = new Scanner(in);
    while (true) {
        var line = scann.nextLine();
        if (line != null && !line.isBlank()) {
            // for each non-empty line, send a message
            // with the userName and the body
            client.tell(new Message(userName, line));
        }
    }
}
where Message is a record defined as:
record Message(String user, String text) {}
Let us now write the main routine with the initialization logic and the main user input loop.
The only thing missing are now the 2 actors!
Client Actor 🔗
The client actor has two states:
- connecting
- ready
We will model them as two behaviors.
- The first behavior
clientConnectingconnects to the socket - when the connection is established it
Becomesready.
If any Message is received while connecting, it is rejected with an error message.
static Actor.Behavior clientConnecting(Address self, Channels.Socket channel) {
    channel.connect()
            .thenAccept(skt -> self.tell(new ClientConnection(skt)))
            .exceptionally(err -> { err.printStackTrace(); return null; });
The connect() method returns a Future<Channels.Socket>. On success, we send the ClientConnection message
to the actor and transition to the ready state.
record ClientConnection(Channels.Socket socket) {}
return msg -> switch (msg) {
    case ClientConnection conn -> {
        var socket = /// clientSocketHandler ?
        yield Become(clientReady(self, socket));
    }
    ...
};
you will notice that we need an actor to handle the socket. This is 100% identical to the one we wrote for the server. We can actually move that code to a ChannelActor.java shared library and share it across the two implementations!
interface ChannelActor {
    record LineRead(String payload) {}
    record WriteLine(String payload) {}
    record ReadBuffer(String content) {}

    static Behavior socketHandler(Address self, Address parent, Channels.Socket channel) {
        return socketHandler(self, parent, channel, "");
    }
    private static Behavior socketHandler(Address self, Address parent, Channels.Socket channel, String acc) {
        channel.read()
                .thenAccept(s -> self.tell(new ReadBuffer(s)))
                .exceptionally(err -> { err.printStackTrace(); return null; });

        return msg -> switch (msg) {
            case ReadBuffer buffer -> {
                var line = acc + buffer.content();
                int eol = line.indexOf(END_LINE);
                if (eol >= 0) {
                    parent.tell(new Channels.Actor.LineRead(line.substring(0, eol)));
                    yield Become(socketHandler(self, parent, channel, line.substring(eol + 2).trim()));
                } else yield Become(socketHandler(self, parent, channel));
            }
            case WriteLine line -> {
                channel.write(line.payload());
                yield Stay;
            }
            default -> throw new RuntimeException("Unhandled message " + msg);
        };
    }
}
then update:
case ClientConnection conn -> {
    var socket =
            system.actorOf(ca -> Channels.Actor.socketHandler(ca, self, conn.socket()));
    yield Become(clientReady(self, socket));
and add to the header:
//SOURCES Channels.java
you can now do the same for the serverSocketHandler in ChatServer and get rid of a bunch of duplicate code:
case ClientConnection conn -> {
    out.println("Child connected!");
    var client =
            system.actorOf(ca -> Channels.Actor.socketHandler(ca, clientManager, conn.socket()));
    ...
}
and add to the header:
//SOURCES Channels.java
Finally, here is the code for ready:
static Actor.Behavior clientReady(Address self, Address socket) {
    var mapper = new ObjectMapper();

    return msg -> {
        try {
            switch (msg) {
                case Message m -> {
                    var jsonMsg = mapper.writeValueAsString(m);
                    socket.tell(new ChannelActor.WriteLine(jsonMsg));
                }
                case ChannelActor.LineRead lr -> {
                    var message = mapper.readValue(lr.payload().trim(), Message.class);
                    out.printf("%s > %s\n", message.user(), message.text());
                }
                default -> throw new RuntimeException("Unhandled message " + msg);
            }
            return Stay;
        } catch(JsonProcessingException e) { throw new UncheckedIOException(e); }
    };
}
In this state, the client receives each line from the server (LineRead), deserializes it, and prints it to standard output.
It also receives each Message from user input. It serializes it, and then tells the server (socket) to write the payload on a new line (WriteLine).
Starting the Client 🔗
And now you are really done: you can now start a client with JBang! Add the following lines at the top of your file:
//JAVA 17
//JAVAC_OPTIONS --enable-preview --release 17
//JAVA_OPTIONS  --enable-preview
//DEPS com.fasterxml.jackson.core:jackson-databind:2.13.0
//DEPS com.github.evacchi:min-java-actors:main-SNAPSHOT
//DEPS com.github.evacchi:java-async-channels:main-SNAPSHOT
//SOURCES Channels.java
If everything is right, then you can type:
j! https://raw.githubusercontent.com/evacchi/min-java-actors/main/src/main/java/io/github/evacchi/asyncchat/ChatClient.java
If you are lazy, you can run it from this Gist directly (make sure the server is running!):
j! https://raw.githubusercontent.com/evacchi/min-java-actors/main/src/main/java/io/github/evacchi/asyncchat/ChatClient.java your-nickname
The program will start waiting for incoming connections, printing something like:
Login...............your-nickname
Local connection..../127.0.0.1:61735
Remote connection...localhost/127.0.0.1:4444
Here is a full demo!
Addendum: A NIO Wrapper 🔗
For this chat application, my friend Andrea helped me and updated my original code using the JDK’s asynchronous Socket API. This API is however a bit clunky, so we wrote some helpers to support CompletableFutures. You can find a full listing here.
The AsynchronousServerSocketChannel API provides all you need to accept() incoming connections from clients. For instance:
var socketChannel = AsynchronousServerSocketChannel.open();
socketChannel.setOption(StandardSocketOptions.SO_REUSEADDR, true);
socketChannel.bind(new InetSocketAddress(HOST, PORT_NUMBER));

socketChannel.accept(null, new CompletionHandler<>() {
    public void completed(AsynchronousSocketChannel result, Void attachment) { /* handle result/attachment */ }
    public void failed(Throwable exc, Void attachment) { /* handle exception/attachment */ }
});
The API being asynchronous, it works through callbacks. Additionally, being the API from Java 1.7, it uses callbacks or the blocking java.util.concurrent.Future instead of lambdas or j.u.c.CompletableFutures.
Each call to accept() on the AsynchronousServerSocketChannel results (if successful) in returning an AsynchronousSocketChannel, which represents a client connection.
So, roughly, this how a chat server and client should work:
The AsynchronousServerSocketChannel waits for connections by accept()ing them:
- every time the callback is invoked a new incoming connection (an
AsynchronousSocketChannel) is returned. - every
AsynchronousSocketChannelrepresents a client connection
For each AsynchronousSocketChannel has been established, the Server:
- reads input from each client connection with
AsynchronousSocketChannel#read() - it broadcasts every input to the output of all client connections
AsynchronousSocketChannel#write()
Both read() and write() sport the same callback-based interface:
var buf = ByteBuffer.wrap(msgBytes);
channel.write(buf, null, new CompletionHandler<>() {
    public void completed(Integer bytesWritten, Void ignored) { /* handle successful case */ }
    public void failed(Throwable exc, Void ignored) { /* handle exception */ }
});

var buf = ByteBuffer.allocate(BUFFER_SIZE);
channel.read(buf, buf, new CompletionHandler<>() {
    public void completed(Integer bytesWritten, ByteBuffer bb) { /* handle bytesWritten/buffer */ }
    public void failed(Throwable exc, ByteBuffer bb) { /* handle exception/buffer */ }
});
Both read() and write() use a ByteBuffer to represent an array of bytes.
In particular, the read() method reads at most BUFFER_SIZE bytes, but it may return earlier.
The Client connects to the server by creating an AsynchronousSocketChannel:
channel.connect(new InetSocketAddress(HOST, PORT_NUMBER), attachment, new CompletionHandler<>() {
    public void completed(Void ignored, Object attachment) { /* handle attachment */ }
    public void failed(Throwable exc, Object attachment) { /* handle exception/attachment */ }
})
- it
read()s from the connection all the incoming messages - it
write()s each incoming message to the standard output (so the user can see it) - it reads user messages from the standard input
Now, order to keep our actors tidy, we may define a couple of handy private utility methods
to convert CompletionHandlers into CompletableFutures:
interface Channels {
    ...
    private static <A, B> CompletionHandler<A, B> handleAttachment(CompletableFuture<B> f) {
        return new CompletionHandler<>() {
            public void completed(A result, B attachment) { f.complete(attachment); }
            public void failed(Throwable exc, B attachment) { f.completeExceptionally(exc); }
        };
    }
    private static <A, B> CompletionHandler<A, B> handleResult(CompletableFuture<A> f) {
        return new CompletionHandler<>() {
            public void completed(A result, B attachment) { f.complete(result); }
            public void failed(Throwable exc, B attachment) { f.completeExceptionally(exc); }
        };
    }
}
You may use these methods directly, but instead, I created two handy wrappers for AsynchronousServerSocketChannel and
AsynchronousSocketChannel, nested under Channels. Channels.ServerSocket is a wrapper for AsynchronousServerSocketChannel:
class ServerSocket {
    AsynchronousServerSocketChannel socketChannel;
    private ServerSocket(AsynchronousServerSocketChannel socketChannel) { this.socketChannel = socketChannel; }

    static ServerSocket open() throws IOException {
        var socketChannel = AsynchronousServerSocketChannel.open();
        socketChannel.setOption(StandardSocketOptions.SO_REUSEADDR, true);
        socketChannel.bind(new InetSocketAddress(HOST, PORT_NUMBER));
        out.printf("Server started at %s.\n", socketChannel.getLocalAddress());
        return new ServerSocket(socketChannel);
    }

    CompletableFuture<Socket> accept() {
        var f = new CompletableFuture<AsynchronousSocketChannel>();
        socketChannel.accept(null, handleResult(f));
        return f.thenApply(Socket::new);
    }
}
and Channels.Socket wraps AsynchronousSocketChannel:
class Socket {
    AsynchronousSocketChannel channel;
    Socket(AsynchronousSocketChannel channel) { this.channel = channel; }

    CompletableFuture<Socket> connect() {
        var f = new CompletableFuture<Socket>();
        channel.connect(new InetSocketAddress(HOST, PORT_NUMBER), this, handleAttachment(f));
        return f;
    }

    /**
     *  writes a string and concatenates a new line
     */
    CompletableFuture<Void> write(String line) {
        var f = new CompletableFuture<Void>();
        var buf = ByteBuffer.wrap((line + END_LINE).getBytes(StandardCharsets.UTF_8));
        channel.write(buf, null, handleAttachment(f));
        return f;
    }

    CompletableFuture<String> read() {
        var f = new CompletableFuture<ByteBuffer>();
        var buf = ByteBuffer.allocate(2048);
        channel.read(buf, buf, handleAttachment(f));
        return f.thenApply(bb -> new String(bb.array()));
    }
}
Conclusions 🔗
In this post we have learned how to write a simple chat app, and we used the asynchronous Socket API.
As promised in the previous post, in the final part of this series we will revisit the actor runtime and define a fully-typed version, which will benefit from exhaustiveness checks!
I am also happy to announce that I have been selected for the Java Advent Calendar 2021, so the last part of this series will be first published on the Java Advent Calendar website! Follow them on Twitter for updates!
See you there!